Platform Interface
Explore the platform's navigation and available tools. The platform supports both virtual and in-person sessions; however, camera and audio controls are only used during virtual sessions.
The platform offers distinct experiences for Participants and Moderators. As a Moderator, you'll have access to additional tools and controls designed to help you manage and facilitate sessions effectively.
1 Layout
The main interface is designed to keep participants oriented and focused on the clinical content throughout the session.
2 Communication
Beneath the patient profile on the right side of the screen, you'll find the communication tools used for participant interaction throughout the session.
3 Video & Audio
The left panel and bottom toolbar contain the controls used to manage video, audio, and overall meeting participation.
4 Navigation
As a Moderator, you have access to additional controls that allow you to guide participants through the case and manage the flow of the session.
1 Layout
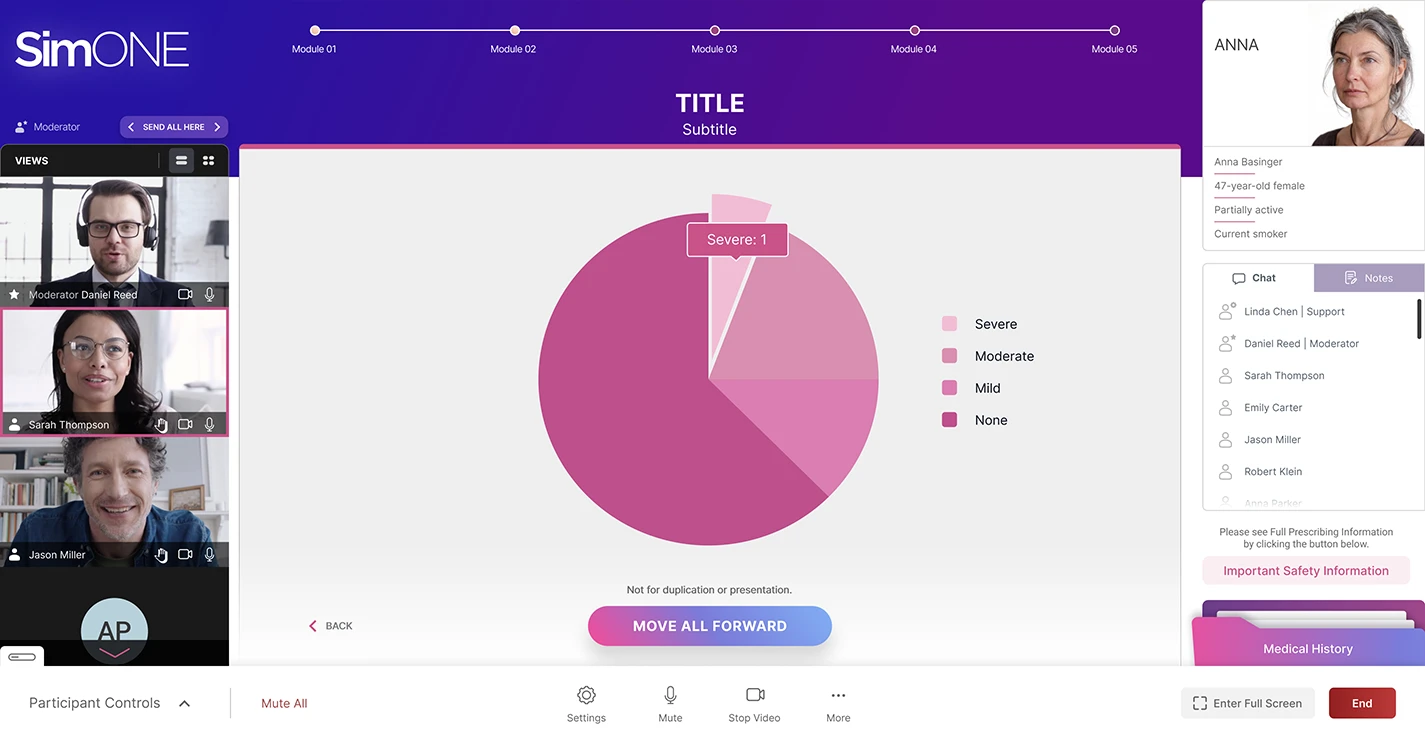
Timeline: Located at the very top of the screen, this indicates where you are in the case review and is visible to both you and the participants.
1 Layout
Patient Profile: In the top right corner, you will find the specific patient being discussed along with their key characteristics.
1 Layout
Render Area: The large white area in the center of the screen is where the primary case content is displayed.
2 Communication & Note-Taking
Chat Feature: Available strictly for virtual sessions, this allows communication among users. As a moderator, you will receive an alert whenever someone writes to you in the chat.
2 Communication & Note-Taking
Private Notes: The note-taking section is only visible to you individually, and your notes are not saved within the platform. As a moderator, you should encourage participants to copy and paste their notes elsewhere if they wish to retain them.
3 Video & Audio Controls
Participant Feeds: The left side of your screen displays the camera feeds of all participants during virtual sessions only.
3 Video & Audio Controls
Grid Settings: Visual signs on top of the camera grid, specifically an equal sign and four dots, allow you to change how you view the camera feeds.
3 Video & Audio Controls
Standard Controls: At the bottom of the screen, participants have standard virtual meeting controls for their camera, virtual background, audio, raising their hand, and selecting their preferred microphone and camera settings.
3 Video & Audio Controls
Moderator Permissions: As a moderator, you have additional controls at the bottom of the screen to mute individual users or mute all participants at the same time. You can also turn off participants' cameras, but you cannot turn them back on.
4 Navigation & Synchronization
Pacing the Group: Inside the main content area, you have Move All Forward and Back buttons to control the pace of the session and ensure all participants stay together.
4 Navigation & Synchronization
Independent Navigation: Located above the camera feed, you have arrows allowing you to move your own screen back and forth through the case content independently of the participants' view.
4 Navigation & Synchronization
Sync Feature: A button next to the independent navigation arrows allows you to instantly synchronize everyone's view back to your current screen.
5 Interactivity & Session Management
Driving Engagement: Lorem ipsum dolor sit amet, consectetur adipiscing elit. Sed do eiusmod tempor incididunt ut labore et dolore magna aliqua.
5 Interactivity & Session Management
The Dashboard: You will receive individualized email credentials to log into the Dashboard. From this dashboard, you can request a session, enter relevant details like date and time, and receive the specific links for yourself and the participants.
5 Interactivity & Session Management
Testing Environments: You can request links to access a testing environment. This allows you to experiment with the controls and become comfortable with the interface before hosting live sessions.